티스토리 뷰
1차..
www.youtube.com/watch?v=MHRt52NNzh0 영상을 보면서 정리합니다.
액티비티에서 액티비티 실행은 기존에 쓰던대로 해도 된대..
내비게이션은 fragment 에서 fragment 이동하는 경우 쓰는 것이 좀 더 좋다..
액티비티 안에서 프래그 두 개 만들어 이동이동
Fragment( 이하 frag)
factory method: frag를 코드로 생성할 때 어떤 파라미터 값을 전달할 때 전달받기 위함..(?)
callback: 외부 액티비티의 결과를 받을 때 설정
내비게이션을 쓰게 되면 factory method는 특히 사용하지 않음
+ 다른블로그 내용을 추가
출처 : two22.tistory.com/7
Navigation은 transaction을 보다 쉽게 구현하기 위한 jetpack component이다.
트랜잭션 말고 애니메이션, 딥링크, 뷰 모델 공유 등의 기능을 가진다.
/
//build.gradle(project)
def nav_version = "2.3.5"
        classpath "androidx.navigation:navigation-safe-args-gradle-plugin:$nav_version"

//build.gradle(app)
def nav_version = "2.3.2"
implementation "androidx.navigation:navigation-fragment-ktx:$nav_version"
implementation "androidx.navigation:navigation-ui-ktx:$nav_version"


//SafeArgs
apply plugin: "androidx.navigation.safeargs"
위 코드는 안드로이드 CameraX 코드에서 가져옴
출처의 코드는 아래와 같다
//project
dependencies {
	classpath "androidx.navigation:navigation-safe-args-gradle-plugin:2.3.0-alpha06"
}

//app
apply plugin: "androidx.navigation.safeargs.kotlin"

dependencies{
	implementation "androidx.navigation:navigation-runtime-ktx:2.2.2"
    implementation "androidx.navigation:navigation-fragment-ktx:2.2.2"
    implementation "androidx.navigation:navigation-ui-ktx:2.2.2"
}
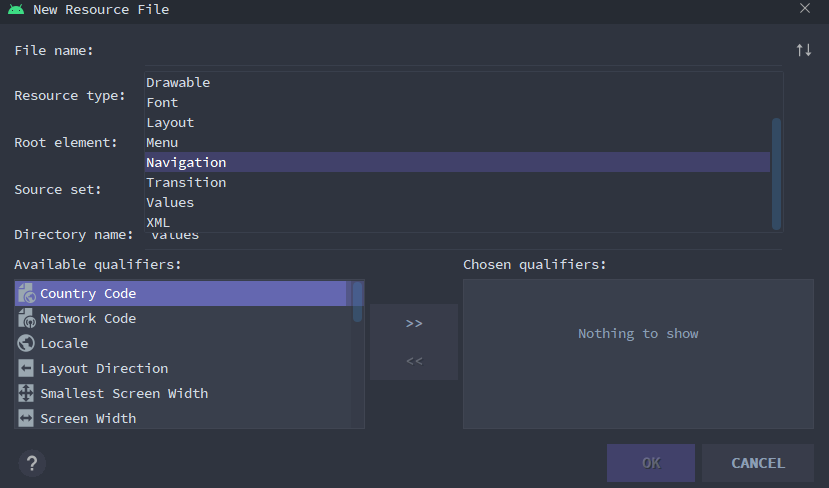
아무튼.. res의 Android Resource File 생성에서 Resource Type을 Navigation으로 만들면 내비게이션을 만들 수 있음


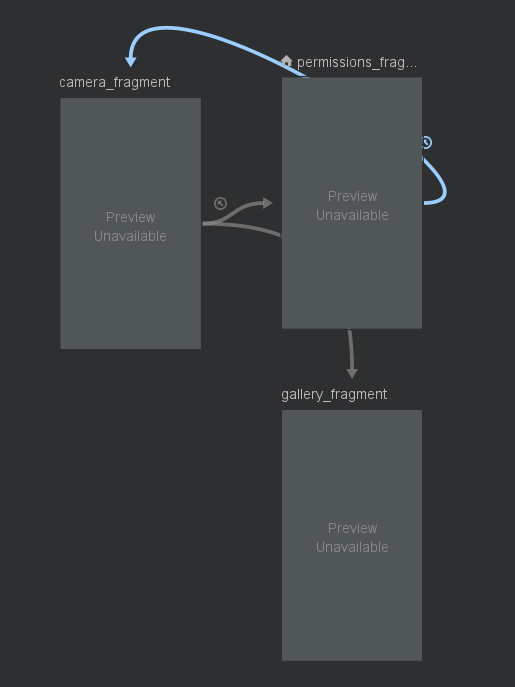
+ 버튼을 통해 화면들을 추가하고 드래그하여 선을 연결하면 그래프 구성이 완료된다.
시작 프래그먼트는 집모양 버튼으로 지정 가능
화살표 선은 코드의 Action에 해당함. Destination이 목적지.
Navigation graph 연결하기!
액티비티(main activity가 주로 되겠지..?)의 레이아웃 (그럼 activity_main.xml이겠지?) 의
fragment, FragmentContainerView 코드를 아래처럼 작성하면 액티비티에서 아무것도 작성하지 않아도
graph의 시작지점부터 화면에 나타난다고..!
<androidx.fragment.app.FragmentContainerView
    xmlns:android="http://schemas.android.com/apk/res/android"
    xmlns:tools="http://schemas.android.com/tools"
    xmlns:app="http://schemas.android.com/apk/res-auto"
    android:id="@+id/fragment_container"
    android:name="androidx.navigation.fragment.NavHostFragment"
    android:layout_width="match_parent"
    android:layout_height="match_parent"
    android:keepScreenOn="true"
    app:defaultNavHost="true"
    app:navGraph="@navigation/nav_graph"
    tools:context=".MainActivity">


</androidx.fragment.app.FragmentContainerView>
안드로이드 CameraX 예
<androidx.constraintlayout.widget.ConstraintLayout
  xmlns:android="http://schemas.android.com/apk/res/android"
  xmlns:app="http://schemas.android.com/apk/res-auto"
  xmlns:tools="http://schemas.android.com/tools"
  android:layout_width="match_parent"
  android:layout_height="match_parent">
    <androidx.fragment.app.FragmentContainerView
      android:id="@+id/nav_host_fragment"
      android:name="androidx.navigation.fragment.NavHostFragment"
      android:layout_width="0dp"
      android:layout_height="0dp"
      app:layout_constraintLeft_toLeftOf="parent"
      app:layout_constraintRight_toRightOf="parent"
      app:layout_constraintTop_toTopOf="parent"
      app:layout_constraintBottom_toBottomOf="parent"
      app:defaultNavHost="true"
      app:navGraph="@navigation/nav_graph" />
</androidx.constraintlayout.widget.ConstraintLayout>
코드 예
Navigation에서 이동할 때에는 NavController를 사용한다.
NavController
in Fragment --> findNavController
in View --> Navigation.findNavController(view)를 통해 가져올 수 있다.

이후 내용은 나중에 세부 학습을 해보자..
'#1 > Android' 카테고리의 다른 글
| 권한 관련 (0) | 2021.05.10 |
|---|---|
| [Android/Kotlin] for문 (0) | 2021.05.10 |
| [Android] Activity, Fragment Activity (0) | 2021.05.07 |
| [Android] Fragment 프래그먼트 (0) | 2021.05.07 |
| [Android] Navigation pass (0) | 2021.05.07 |

 -->
-->